1-zabbix基础监控
介绍:Zabbix5.0
Zabbix-server 10.0.0.80 Ubuntu1804
Zabbix-agent 10.0.0.60-61 Rocky8.6
Zabbix-agent 10.0.0.10-12 Centos7.6
Zabbix-agent 10.0.0.40-42 Ubuntu2004
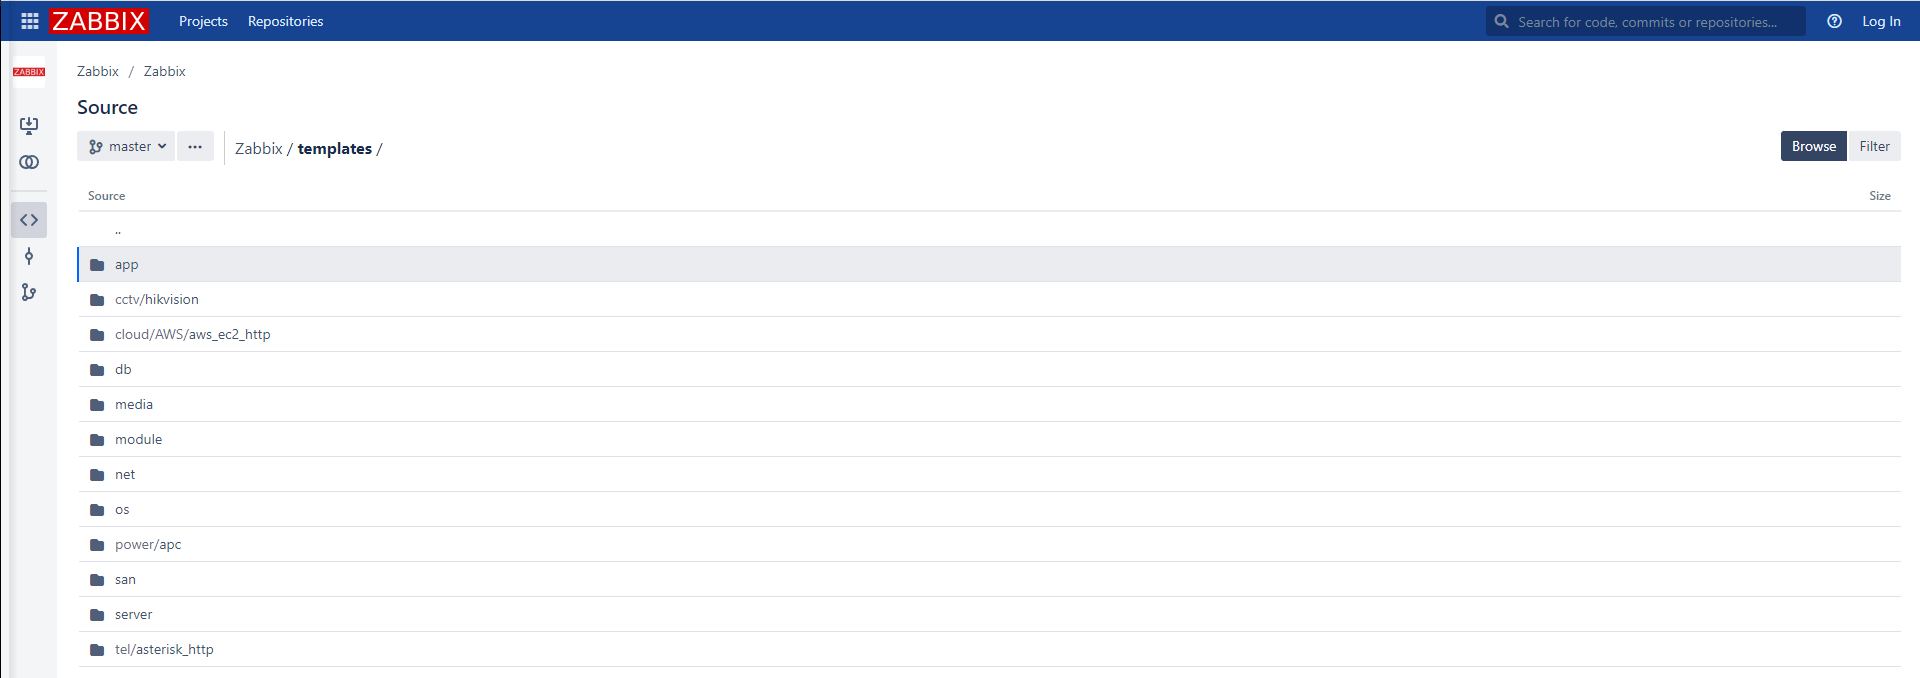
内置模版参考链接:
https://git.zabbix.com/projects/ZBX/repos/zabbix/browse/templates
1.1给Rocky-8.6(Centos8)的系统安装5.0-zabbix-agent
只需要配置官网的yum源到本地即可,可以直接区下载zabbix-agent的prm包
官网
https://www.zabbix.com/download?zabbix=5.0&os_distribution=centos&os_version=8_stream&db=mysql&ws=apache
# rpm -Uvh https://repo.zabbix.com/zabbix/5.0/rhel/8/x86_64/zabbix-release-5.0-1.el8.noarch.rpm
# dnf clean all
# dnf install zabbix-agent -y
或者
wget https://mirrors.tuna.tsinghua.edu.cn/zabbix/zabbix/5.0/rhel/8/x86_64/zabbix-agent-5.0.25-1.el8.x86_64.rpm
rpm -ivh zabbix-agent-5.0.25-1.el8.x86_64.rpm
只需要配置官网的apt源到本地即可,可以直接区下载zabbix-agent的dede包
https://www.zabbix.com/download?zabbix=5.0&os_distribution=ubuntu&os_version=18.04_bionic&db=mysql&ws=apache
# wget https://repo.zabbix.com/zabbix/5.0/ubuntu/pool/main/z/zabbix-release/zabbix-release_5.0-1+bionic_all.deb
# dpkg -i zabbix-release_5.0-1+bionic_all.deb
# apt update
# apt install zabbix-agent
只需要配置官网的apt源到本地即可,可以直接区下载zabbix-agent的dede包
官网
# wget https://repo.zabbix.com/zabbix/5.0/ubuntu/pool/main/z/zabbix-release/zabbix-release_5.0-1+focal_all.deb
# dpkg -i zabbix-release_5.0-1+focal_all.deb
# apt update
# apt install zabbix-agent
只需要配置官网的yum源到本地即可,可以直接区下载zabbix-agent的prm包
官网
https://www.zabbix.com/download?zabbix=5.0&os_distribution=centos&os_version=7&db=mysql&ws=apache
# rpm -Uvh https://repo.zabbix.com/zabbix/5.0/rhel/7/x86_64/zabbix-release-5.0-1.el7.noarch.rpm
# yum clean all
# yum install zabbix-agent -y
或者
# wget https://mirrors.tuna.tsinghua.edu.cn/zabbix/zabbix/5.0/rhel/7/x86_64/zabbix-agent-5.0.25-1.el7.x86_64.rpm
# rpm -ivh zabbix-agent-5.0.25-1.el7.x86_64.rpm
修改zabbix-agent配置文件,指向zabbix-server的ip
Ubuntu和rocky/Centos7同理
如果是多个zabbix服务器可以用
多个服务器写法
Server="10.0.0.80,10.0.0.81
[root@rocky8 ~]# sed -i 's/^Server=127.0.0.1/Server=10.0.0.80/' /etc/zabbix/zabbix_agentd.conf
1.6启动服务并设置为开机自启动
[root@rocky8 ~]# systemctl enable zabbix-agent.service --now
Created symlink /etc/systemd/system/multi-user.target.wants/zabbix-agent.service → /usr/lib/systemd/system/zabbix-agent.service.
可以在服务端利用zabbix_get查看监控项,看看有没有监控到这台主机
root@zabbix-server:~# zabbix_get -s 10.0.0.60 -k "agent.ping"
1
解释
	zabbix_get
		监控命令取值命令

	-s 10.0.0.60
		指定zabbix-agent客户端的IP地址

	-k
		取一个监控下的名称

	"agent.ping"
		ping的监控项
把rocky8.6-1这台主机添加到zabbix监控里面去
http://10.0.0.80/zabbix/


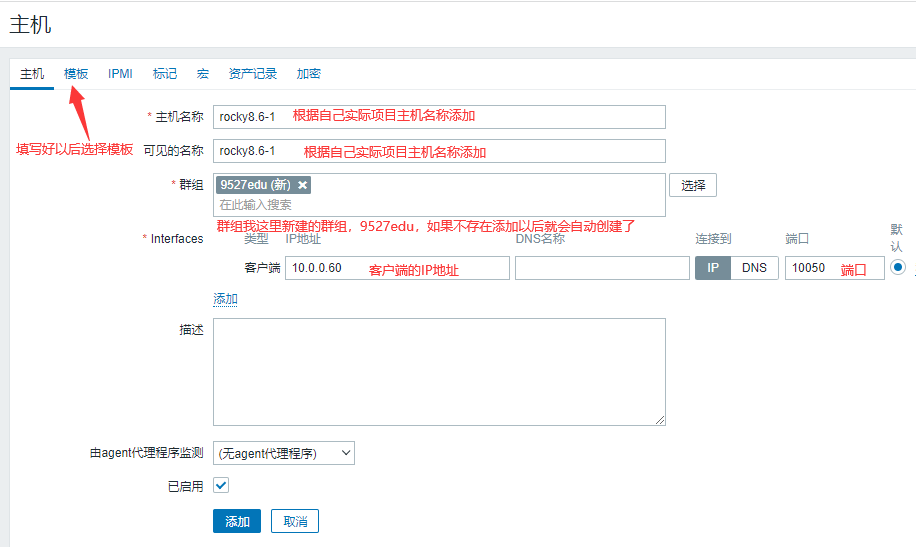
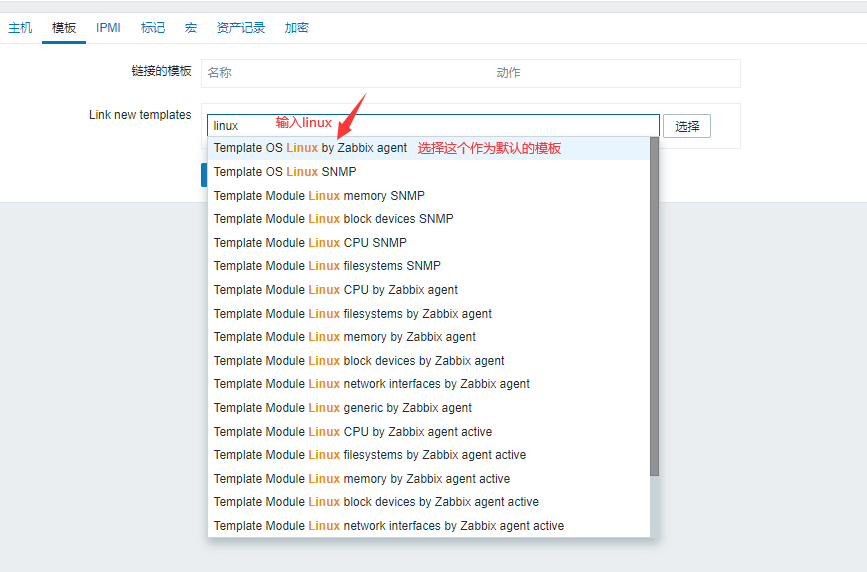


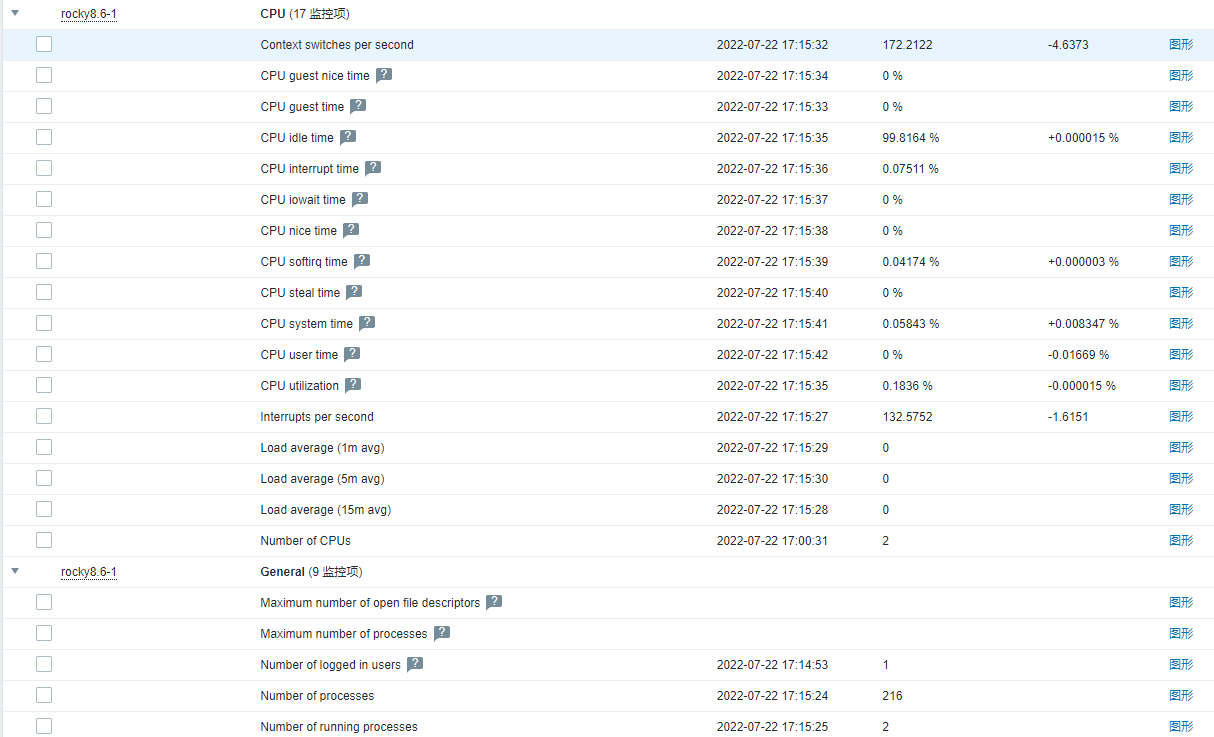
先点击检测----主机,找到刚才监控的rocky8.6-1查看最新数据
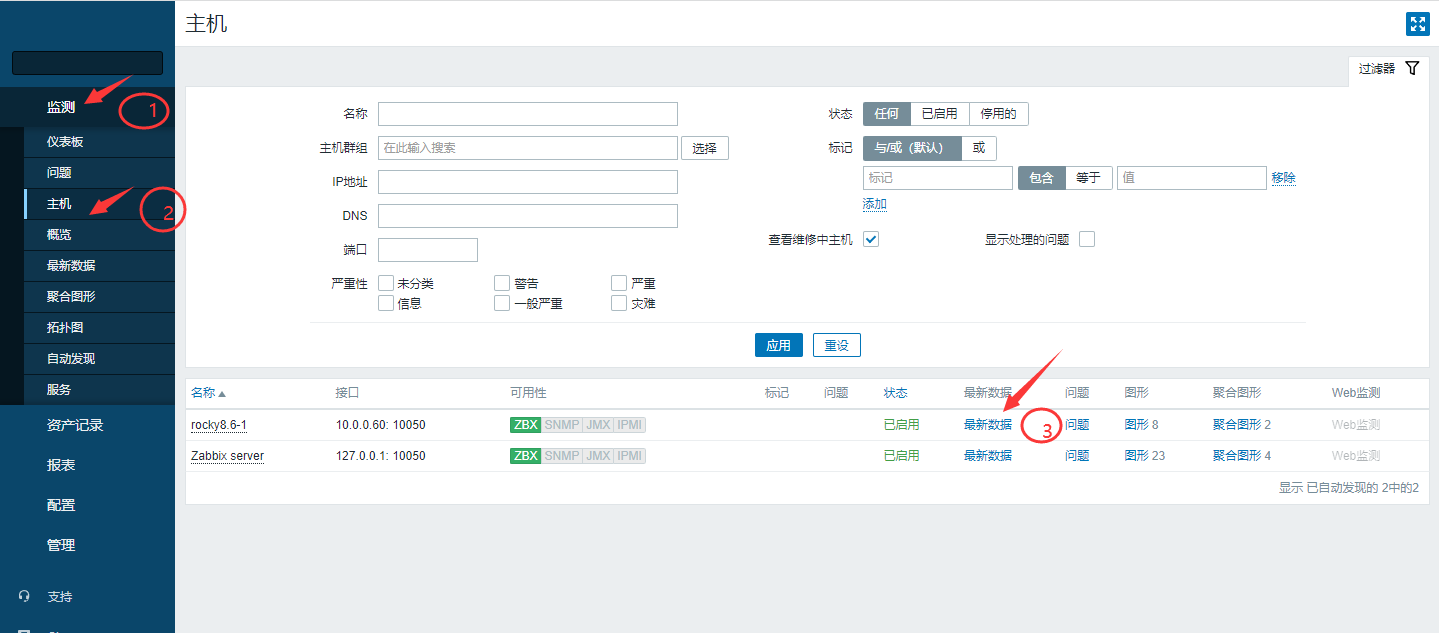
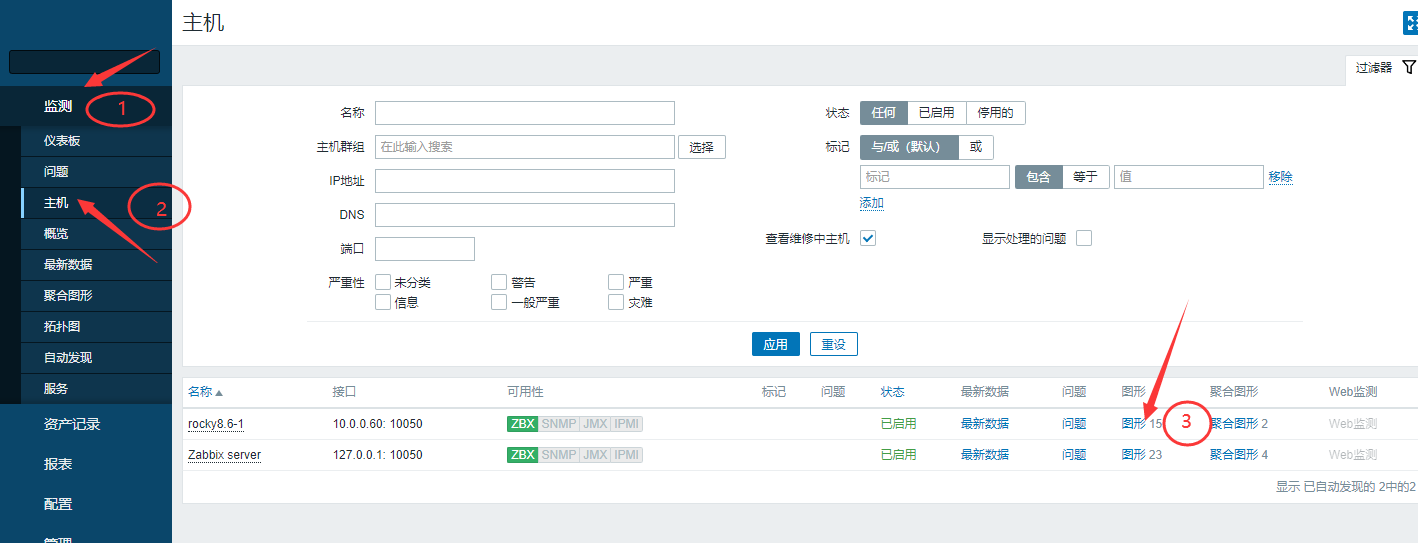
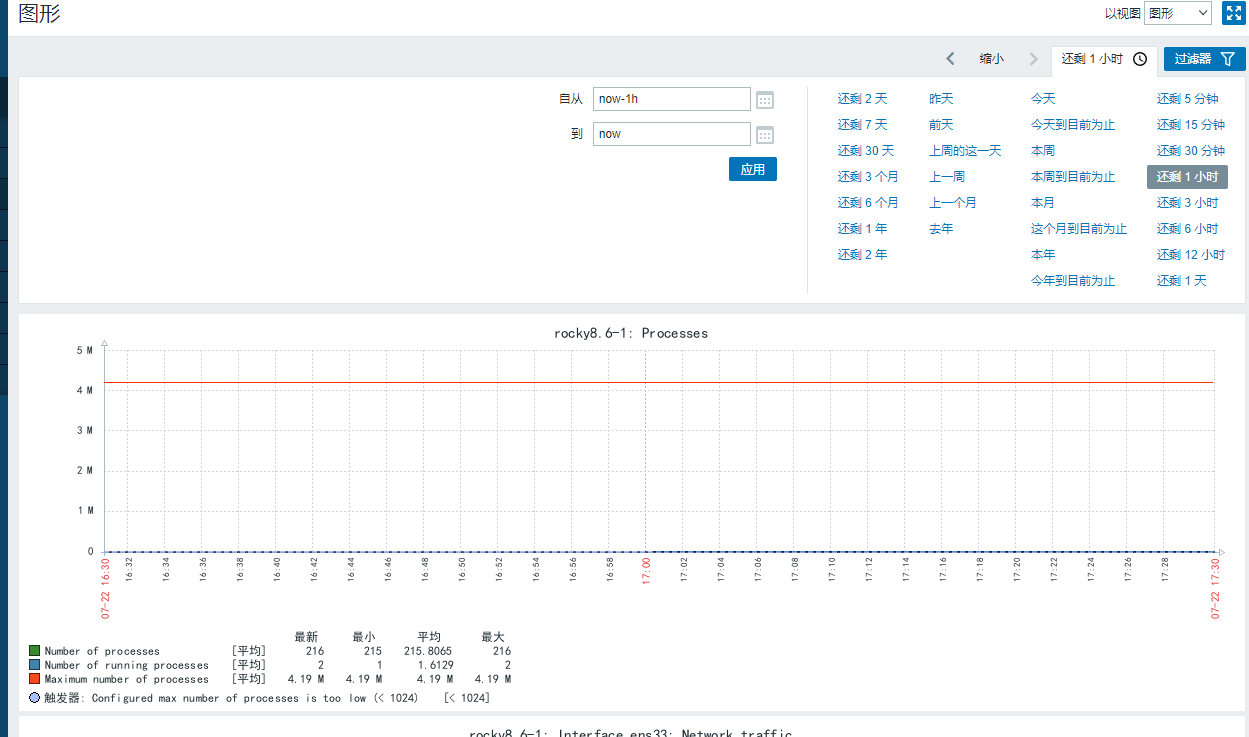
查看图形-检测-主机-rockry8.6-1的图形
在rocky8.6-1这台主机上面安装nginx服务,并监控nginx
[root@rocky8 ~]# yum install nginx -y
[root@rocky8 ~]# systemctl enable nginx.service --now
Created symlink /etc/systemd/system/multi-user.target.wants/nginx.service → /usr/lib/systemd/system/nginx.service.
nginx 模版参考:
https://git.zabbix.com/projects/ZBX/repos/zabbix/browse/templates/app/nginx_http
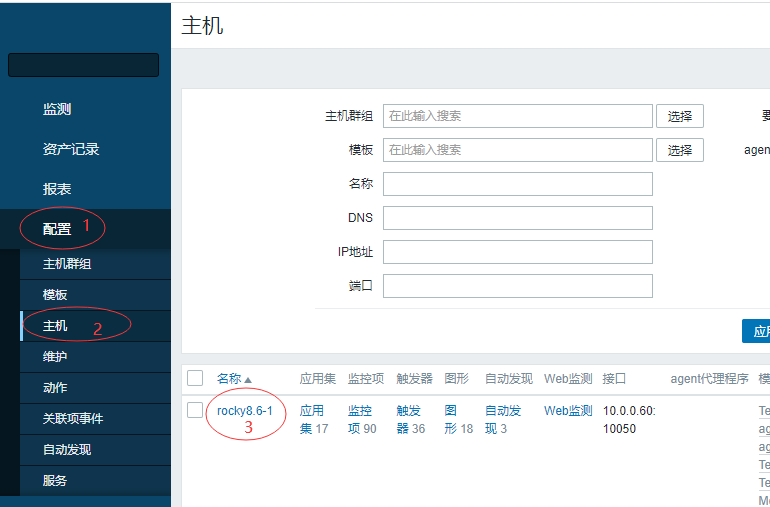
找到rockry8.6-1这台主机
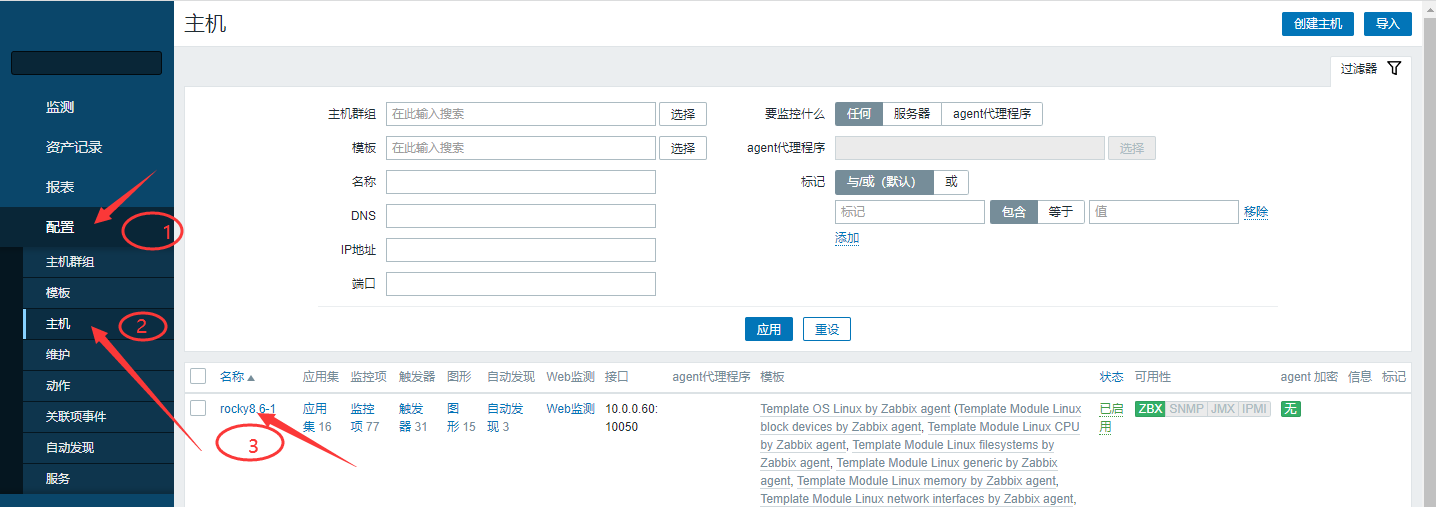
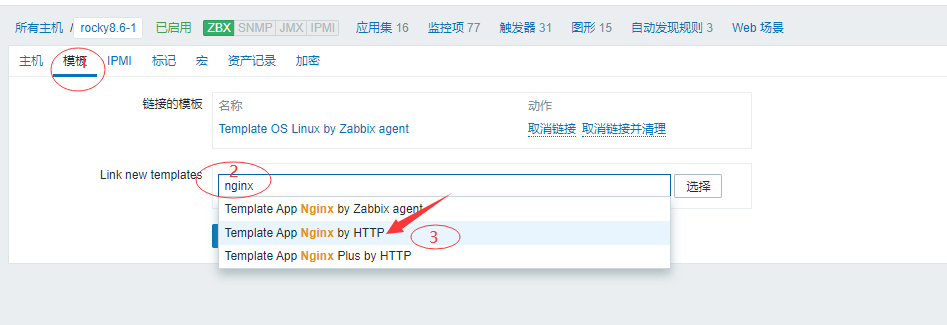
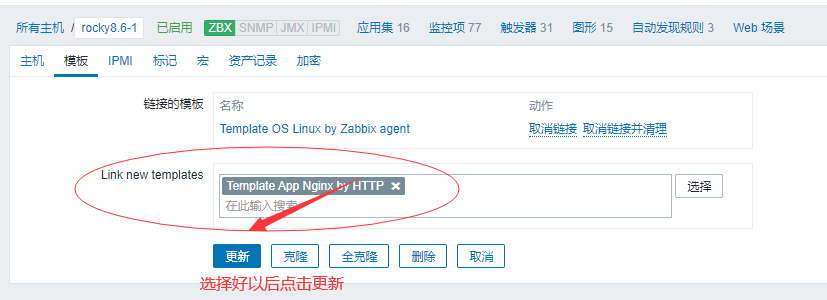
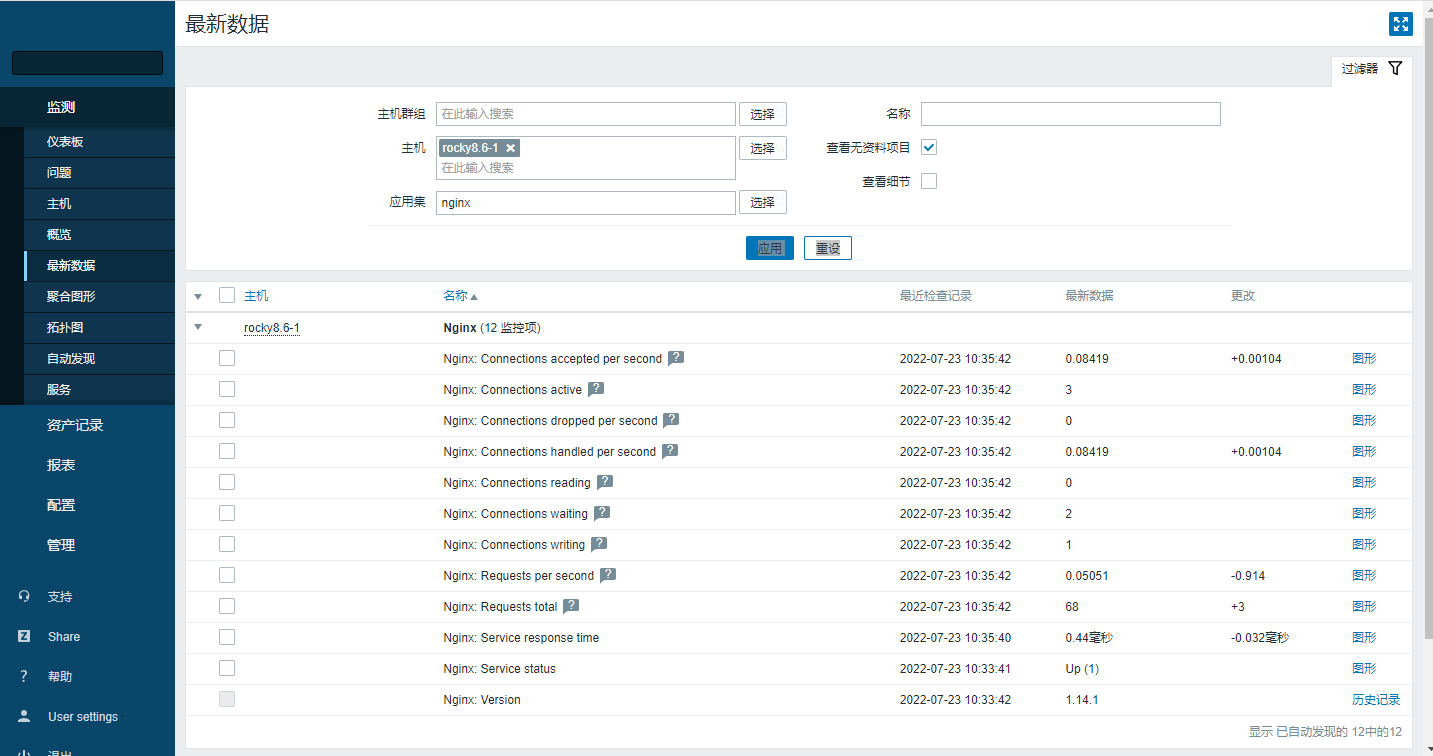
查看rocky8.6-1这台主机nginx的应用集
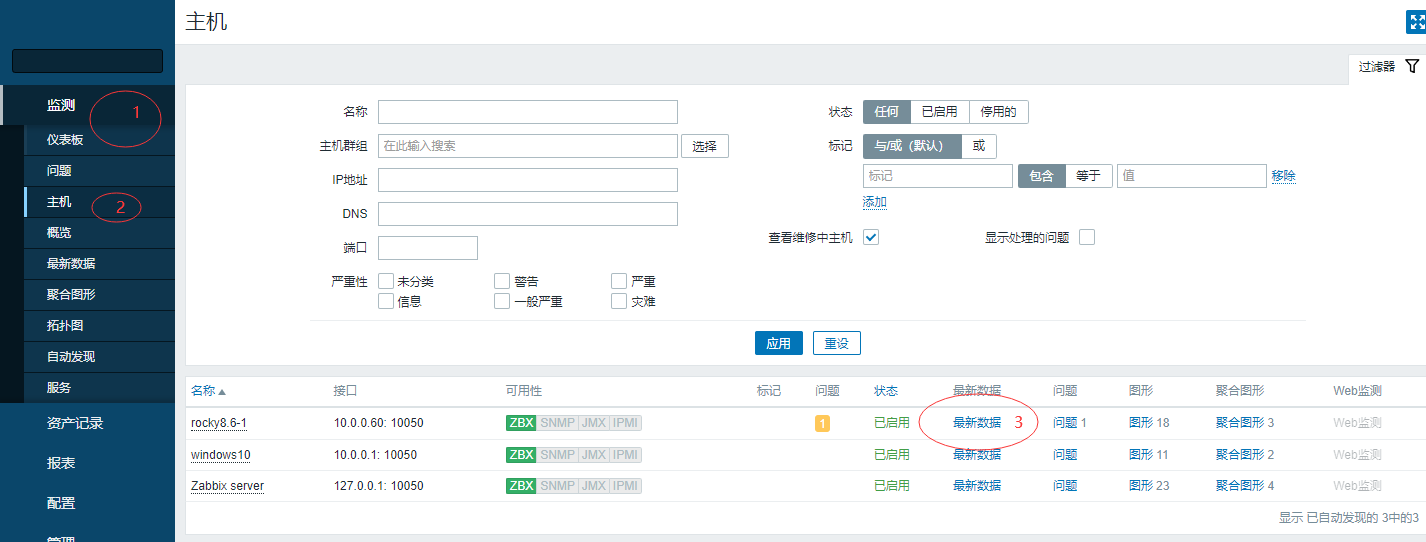
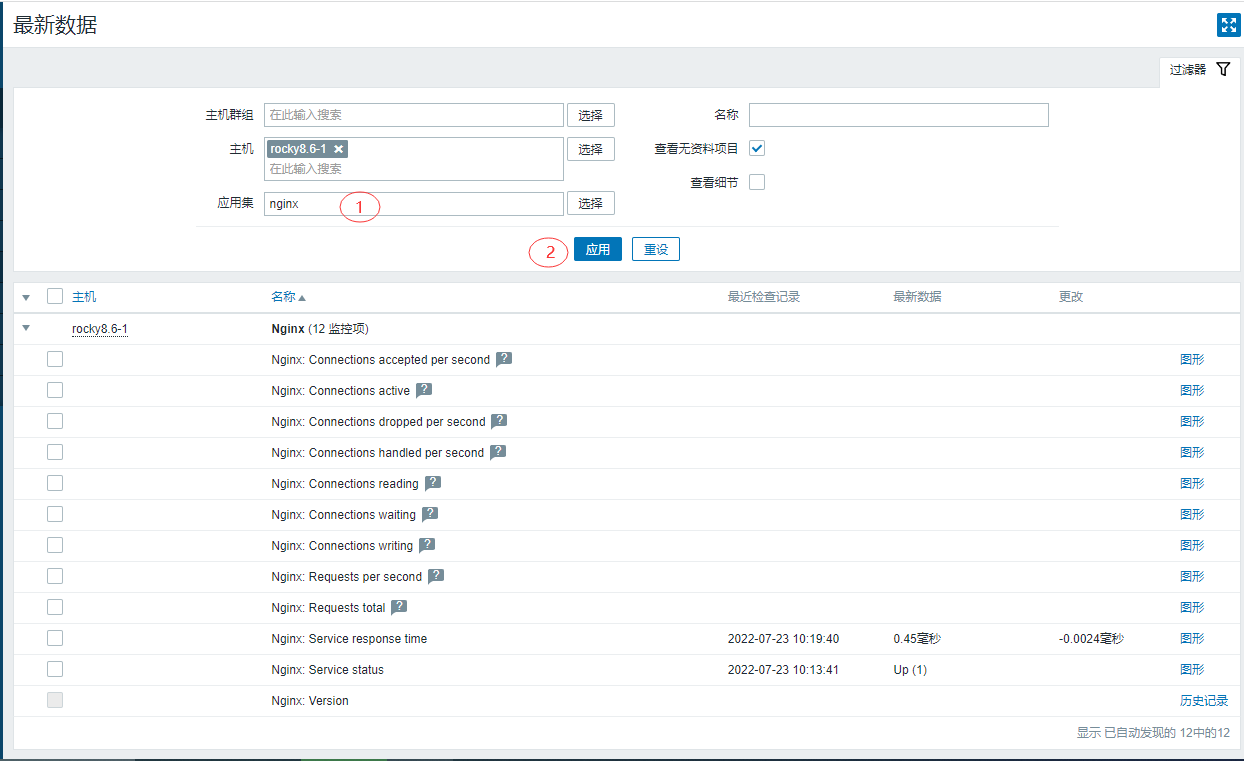
开启nginx的状态页
worker_processes  1;
events {
    worker_connections  1024;
}
http {
    include       mime.types;
    default_type  application/octet-stream;
    sendfile        on;
    keepalive_timeout  65;
    server {
        listen       80;
        server_name  localhost;
        location / {
            root   html;
            index  index.html index.htm;
        }
        location = /basic_status {
           stub_status;
           allow 10.0.0.80;
           #只允许zabbix-server访问
           deny all;
        }
        error_page   500 502 503 504  /50x.html;
        location = /50x.html {
            root   html;
        }
    }
}
修改好以后重新加载nginx的配置文件,让修改生效
[root@rocky8 ~]# systemctl reload nginx.service
在Server段添加如下内容
location = /basic_status {
    stub_status;
    allow <IP of your Zabbix server/proxy>;
    deny all;
}
Zbbix-server监控php-fpm
在rocky8.6-1这台主机上面安装php-fpm
[root@rocky8 ~]# dnf install php-fpm -y
修改/etc/php-fpm.d/www.conf用户和组为nginx
[root@rocky8 ~]# sed -i.bak 's/user = apache/user = nginx/g'  /etc/php-fpm.d/www.conf
[root@rocky8 ~]# sed -i 's/group = apache/group = nginx/g'  /etc/php-fpm.d/www.conf
开启监控选项
[root@rocky8 ~]# sed -i 's#;pm.status_path = /status#pm.status_path = /status#g' /etc/php-fpm.d/www.conf
[root@rocky8 ~]# sed -i 's#;ping.path = /ping#ping.path = /ping#g' /etc/php-fpm.d/www.conf

默认php-fpm是socker监听的,修改成ip监听
[root@rocky8 ~]# sed -i 's#listen = /run/php-fpm/www.sock#;listen = /run/php-fpm/www.sock#g' /etc/php-fpm.d/www.conf
修改成ip监听
[root@rocky8 ~]# sed -i 's#;listen = /run/php-fpm/www.sock#listen = 127.0.0.1:9000#g'  /etc/php-fpm.d/www.conff
开启php-fpm
检测配置文件修改有没有问题
[root@rocky8 ~]# php-fpm -t
[23-Jul-2022 11:47:40] NOTICE: configuration file /etc/php-fpm.conf test is successful

开启和开机自启动
[root@rocky8 ~]# systemctl enable php-fpm.service --now
Created symlink /etc/systemd/system/multi-user.target.wants/php-fpm.service → /usr/lib/systemd/system/php-fpm.service.
开启nginx的代理
vim [root@rocky8 ~]# vim /etc/nginx/nginx.conf
worker_processes  1;
events {
    worker_connections  1024;
}
http {
    include       mime.types;
    default_type  application/octet-stream;
    sendfile        on;
    keepalive_timeout  65;
    server {
        listen       80;
        server_name  localhost;
        location / {
            root   html;
            index  index.html index.htm;
        }
	location = /basic_status {
	   stub_status;
	   allow 10.0.0.80;
           deny all;
	}
	location ~ ^/(status|ping)$ {
		   access_log off;
		   #这里是zabbix-server的ip地址允许zabbix的ip访问这个页面
		   allow 10.0.0.80;
		   # allow 1.2.3.4;    # your IP here
		   deny all;
	           root           html;
	           fastcgi_pass   127.0.0.1:9000;
	           fastcgi_index  index.php;
		   fastcgi_param SCRIPT_FILENAME $document_root$fastcgi_script_name;
	           include        fastcgi_params;
	}

        error_page   500 502 503 504  /50x.html;
        location = /50x.html {
            root   html;
        }
    }
}
检查服务并重新加载配置
[root@rocky8 ~]# nginx -t
nginx: the configuration file /etc/nginx/nginx.conf syntax is ok
nginx: configuration file /etc/nginx/nginx.conf test is successful
[root@rocky8 ~]# systemctl reload nginx.servic
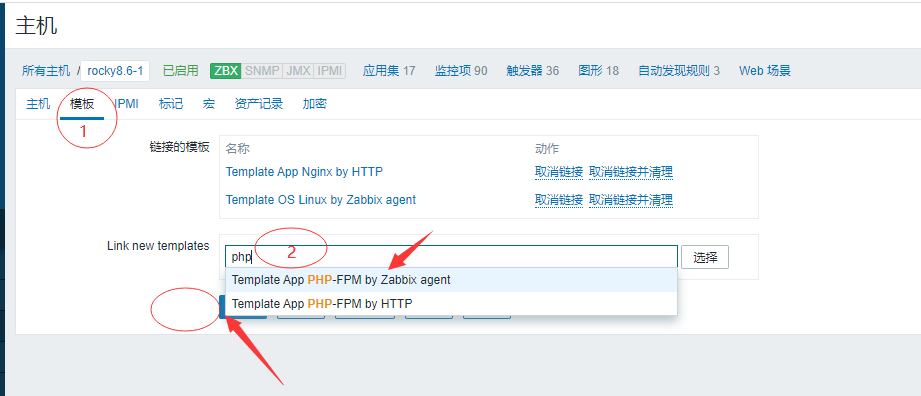
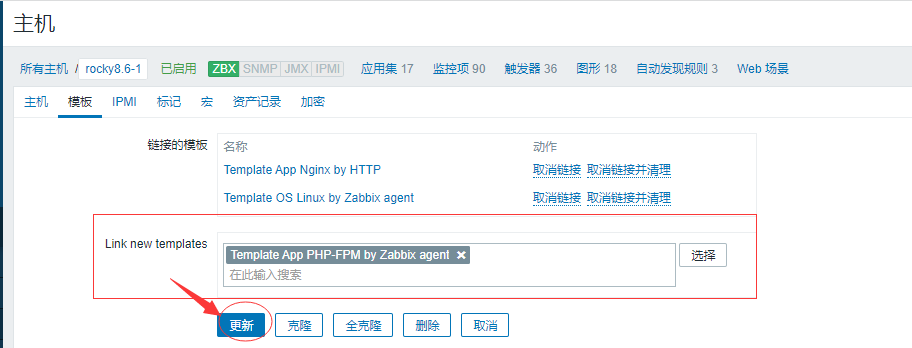
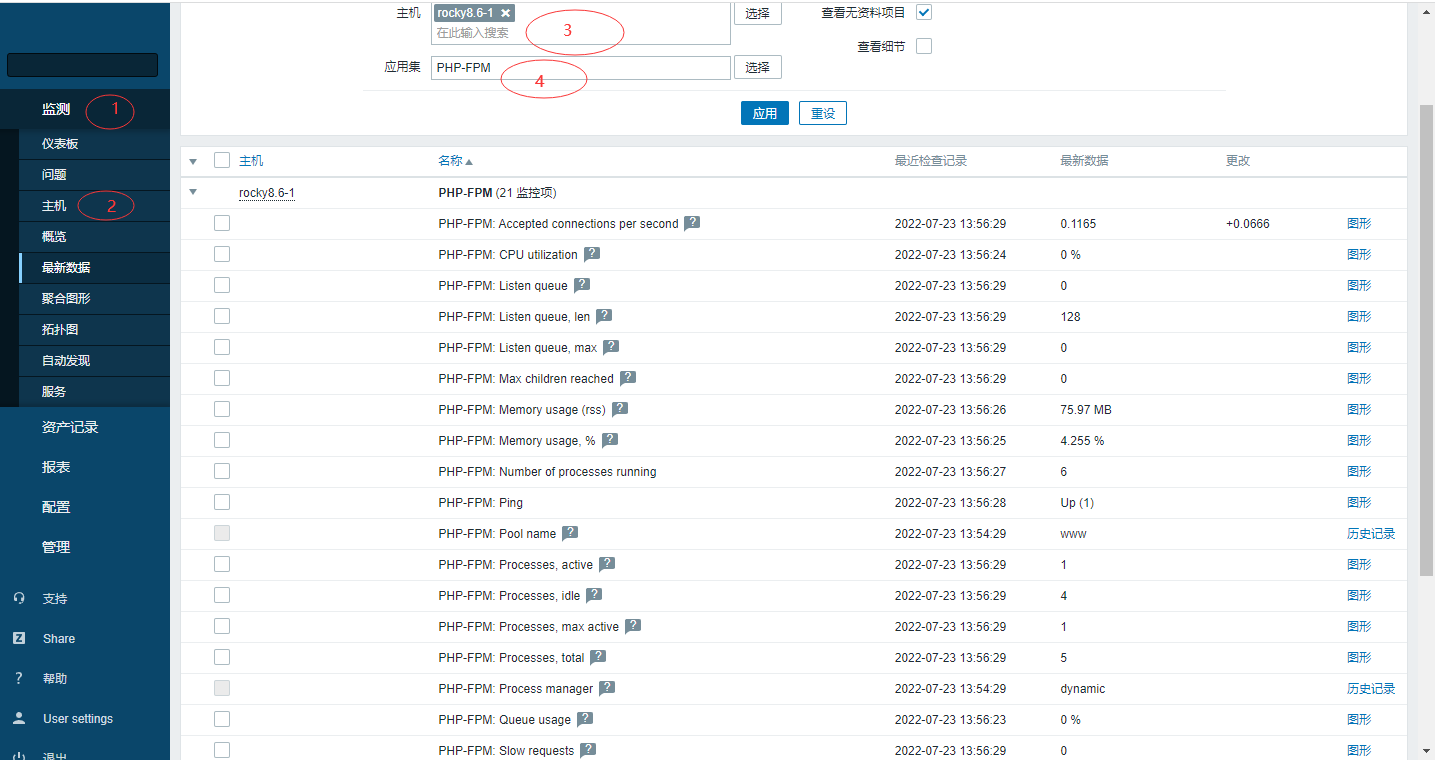
php-fpm_agent
