系统Ubuntu 1804
配置
CPU:2核
内存:4G(最少4G)
硬盘:120G
IP:10.0.0.80
安装帮助:https://docs.gitlab.com/ee/install/

官方安装软件包下载:https://packages.gitlab.com/gitlab/

国内下载地址:https://mirrors.tuna.tsinghua.edu.cn/gitlab-ce/

ubuntu 1804详细下载地址:https://mirrors.tuna.tsinghua.edu.cn/gitlab-ce/ubuntu/pool/bionic/main/g/gitlab-ce/

gitlab下载地址:https://mirrors.tuna.tsinghua.edu.cn/gitlab-ce/ubuntu/pool/bionic/main/g/gitlab-ce/gitlab-ce_14.3.2-ce.0_amd64.deb
修改主机名
root@gitlab:~# hostnamectl set-hostname gitlab.9527edu.org

查看自己的版本,根据自己的版本区下载对应的gitlab包
root@gitlab:~# cat /etc/os-release
NAME="Ubuntu"
VERSION="18.04.6 LTS (Bionic Beaver)"
ID=ubuntu
ID_LIKE=debian
PRETTY_NAME="Ubuntu 18.04.6 LTS"
VERSION_ID="18.04"
HOME_URL="https://www.ubuntu.com/"
SUPPORT_URL="https://help.ubuntu.com/"
BUG_REPORT_URL="https://bugs.launchpad.net/ubuntu/"
PRIVACY_POLICY_URL="https://www.ubuntu.com/legal/terms-and-policies/privacy-policy"
VERSION_CODENAME=bionic
UBUNTU_CODENAME=bionic

配置阿里云镜像源
root@gitlab:~# vim /etc/apt/sources.list
##需要把原有的内容注释掉
##最后一行再添加新内容
deb http://mirrors.aliyun.com/ubuntu/ bionic main restricted universe multiverse
deb-src http://mirrors.aliyun.com/ubuntu/ bionic main restricted universe multiverse

deb http://mirrors.aliyun.com/ubuntu/ bionic-security main restricted universe multiverse
deb-src http://mirrors.aliyun.com/ubuntu/ bionic-security main restricted universe multiverse

deb http://mirrors.aliyun.com/ubuntu/ bionic-updates main restricted universe multiverse
deb-src http://mirrors.aliyun.com/ubuntu/ bionic-updates main restricted universe multiverse

# deb http://mirrors.aliyun.com/ubuntu/ bionic-proposed main restricted universe multiverse
# deb-src http://mirrors.aliyun.com/ubuntu/ bionic-proposed main restricted universe multiverse

deb http://mirrors.aliyun.com/ubuntu/ bionic-backports main restricted universe multiverse
deb-src http://mirrors.aliyun.com/ubuntu/ bionic-backports main restricted universe multiverse

更新软件源
root@gitlab:~# apt update

安装常用软件
root@gitlab:~# apt install iproute2 ntpdate tcpdump telnet traceroute nfs-kernel-server nfs-common lrzsz tree openssl libssl-dev libpcre3 libpcre3-dev zlib1g-dev ntpdate tcpdump telnet traceroute gcc openssh-server lrzsz tree openssl libssl-dev libpcre3 libpcre3-dev zlib1g-dev ntpdate tcpdump telnet traceroute iotop unzip zip ipmitool -y
安装gitlab
下载
root@gitlab:~#	wget https://mirrors.tuna.tsinghua.edu.cn/gitlab-ce/ubuntu/pool/bionic/main/g/gitlab-ce/gitlab-ce_14.3.2-ce.0_amd64.deb

安装gitlab
root@gitlab:~# 	root@gitlab:~# dpkg -i gitlab-ce_14.3.2-ce.0_amd64.deb
Selecting previously unselected package gitlab-ce.
(Reading database ... 67382 files and directories currently installed.)
Preparing to unpack gitlab-ce_14.3.2-ce.0_amd64.deb ...
Unpacking gitlab-ce (14.3.2-ce.0) ...
Setting up gitlab-ce (14.3.2-ce.0) ...
It looks like GitLab has not been configured yet; skipping the upgrade script.

       *.                  *.
      ***                 ***
     *****               *****
    .******             *******
    ********            ********
   ,,,,,,,,,***********,,,,,,,,,
  ,,,,,,,,,,,*********,,,,,,,,,,,
  .,,,,,,,,,,,*******,,,,,,,,,,,,
      ,,,,,,,,,*****,,,,,,,,,.
         ,,,,,,,****,,,,,,
            .,,,***,,,,
                ,*,.


     _______ __  __          __
    / ____(_) /_/ /   ____ _/ /_
   / / __/ / __/ /   / __ `/ __ \
  / /_/ / / /_/ /___/ /_/ / /_/ /
  \____/_/\__/_____/\__,_/_.___/


Thank you for installing GitLab!
GitLab was unable to detect a valid hostname for your instance.
Please configure a URL for your GitLab instance by setting `external_url`
configuration in /etc/gitlab/gitlab.rb file.
Then, you can start your GitLab instance by running the following command:
  sudo gitlab-ctl reconfigure

For a comprehensive list of configuration options please see the Omnibus GitLab readme
https://gitlab.com/gitlab-org/omnibus-gitlab/blob/master/README.md

Help us improve the installation experience, let us know how we did with a 1 minute survey:
https://gitlab.fra1.qualtrics.com/jfe/form/SV_6kVqZANThUQ1bZb?installation=omnibus&release=14-3
修改giglab配置文件
修改之前先备份一下默认的配置,防止改错了,没有办法恢复
root@gitlab:~#  cp /etc/gitlab/gitlab.rb{,.bak}

修改配置文件,
root@gitlab:~# vim /etc/gitlab/gitlab.rb
原内容
external_url 'http://gitlab.example.com'
改后
external_url 'http://gitlab.9527edu.org'
保存退出
再来添加邮件收发
cat >> /etc/gitlab/gitlab.rb <<EOF
gitlab_rails['smtp_enable'] = true
gitlab_rails['smtp_address'] = "smtp.qq.com"
gitlab_rails['smtp_port'] = 465
gitlab_rails['smtp_user_name'] = "372097243@qq.com"
gitlab_rails['smtp_password'] = "密码"
gitlab_rails['smtp_domain'] = "qq.com"
gitlab_rails['smtp_authentication'] = :login
gitlab_rails['smtp_enable_starttls_auto'] = true
gitlab_rails['smtp_tls'] = true
gitlab_rails['gitlab_email_from'] = "372097243@qq.com"
user["git_user_email"] = "372097243@qq.com"
EOF

#新版中增加下面行,给root用户指定初始密码才能登录
gitlab_rails['initial_root_password'] = "12345678"
需要把这一项开起来,开启了以后会弹出一个对话框,对话框里面有你的密码

初始化gitlan
初始化之前修改一项内核参数,默认ubuntu的内存设置是当内存达到一定的值以后会使用swap交换分区作为内存使用,我们需要禁用掉此项
cat >> /etc/sysctl.conf << EOF
vm.swappiness = 0
EOF

生效配置
# sysctl -p

初始化gitlab,初始化过程可能时间会比较久
root@gitlab:~# gitlab-ctl reconfigure

初始化好以后密码存放路径
/etc/gitlab/initial_root_password

查看密码,密码会和我的不一样,根据自己的实际的密码做为登录
root@gitlab:~# cat /etc/gitlab/initial_root_password
返回结果:
# WARNING: This value is valid only in the following conditions
#          1. If provided manually (either via `GITLAB_ROOT_PASSWORD` environment variable or via `gitlab_rails['initial_root_password']` setting in `gitlab.rb`, it was provided before database was seeded for the first time (usually, the first reconfigure run).
#          2. Password hasn't been changed manually, either via UI or via command line.
#
#          If the password shown here doesn't work, you must reset the admin password following https://docs.gitlab.com/ee/security/reset_user_password.html#reset-your-root-password.

Password: 3Z52H1o/MgEgn1Mv/9iqvvDMH8DrHoxsM2ZXHHNFXec=

# NOTE: This file will be automatically deleted in the first reconfigure run after 24 hours.
做host解析,修改本地的hosts的文件
这是windows路径,用文本编辑器打开
C:\Windows\System32\drivers\etc\hosts
最后一行添加解析,ip根据自己的ip地址修改
10.0.0.80 gitlab.9527edu.org
用浏览器访问 gitlab.9527edu.org
http://gitlab.9527edu.org/users/sign_in

登录
用户:root
密码在/etc/gitlab/initial_root_password文件的Password: 3Z52H1o/MgEgn1Mv/9iqvvDMH8DrHoxsM2ZXHHNFXec=
密码:3Z52H1o/MgEgn1Mv/9iqvvDMH8DrHoxsM2ZXHHNFXec=
修改默认的密码,改成自己能记住的密码
修改密码,新改的密码必须超过8位

我修改的密码是123456789,修改好以后重新登录即可
root@gitlab:~# gitlab-ctl status
run: alertmanager: (pid 20963) 2494s; run: log: (pid 20741) 2550s
run: gitaly: (pid 20995) 2493s; run: log: (pid 20095) 2669s
run: gitlab-exporter: (pid 20932) 2496s; run: log: (pid 20571) 2570s
run: gitlab-workhorse: (pid 20915) 2497s; run: log: (pid 20492) 2584s
run: grafana: (pid 20986) 2493s; run: log: (pid 20859) 2512s
run: logrotate: (pid 20008) 2682s; run: log: (pid 20021) 2681s
run: nginx: (pid 20501) 2583s; run: log: (pid 20519) 2580s
run: node-exporter: (pid 20926) 2496s; run: log: (pid 20555) 2576s
run: postgres-exporter: (pid 20979) 2493s; run: log: (pid 20763) 2546s
run: postgresql: (pid 20236) 2664s; run: log: (pid 20290) 2661s
run: prometheus: (pid 20942) 2495s; run: log: (pid 20702) 2558s
run: puma: (pid 20426) 2597s; run: log: (pid 20433) 2596s
run: redis: (pid 20043) 2676s; run: log: (pid 20066) 2673s
run: redis-exporter: (pid 20934) 2495s; run: log: (pid 20626) 2562s
run: sidekiq: (pid 20443) 2591s; run: log: (pid 20453) 2590s
gitlab的常用命令
gitlab-rails #用于启动控制台进行特殊操作,如修改管理员密码、打开数据库控制台( gitlab-rails dbconsole)等
gitlab-psql #数据库命令行
gitlab-rake #数据备份恢复等数据操作
#客户端命令行操作行
gitlab-ctl
gitlab-ctl reconfigure #修改过配置后需要执行重新配置
gitlab-ctl stop #停止gitlab
gitlab-ctl start #启动gitlab
gitlab-ctl restart #重启gitlab
gitlab-ctl status #查看组件运行状态
gitlab-ctl tail    #查看所有日志
gitlab-ctl tail nginx #查看某个组件的日志
gitlab-ctl service-list #列出服务
root@gitlab:~# gitlab-psql
psql (12.7)
Type "help" for help.

gitlabhq_production=# help
You are using psql, the command-line interface to PostgreSQL.
Type:  \copyright for distribution terms
       \h for help with SQL commands
       \? for help with psql commands
       \g or terminate with semicolon to execute query
       \q to quit
gitlabhq_production=# \db
         List of tablespaces
    Name    |    Owner    | Location
------------+-------------+----------
 pg_default | gitlab-psql |
 pg_global  | gitlab-psql |
(2 rows)
推出
\q
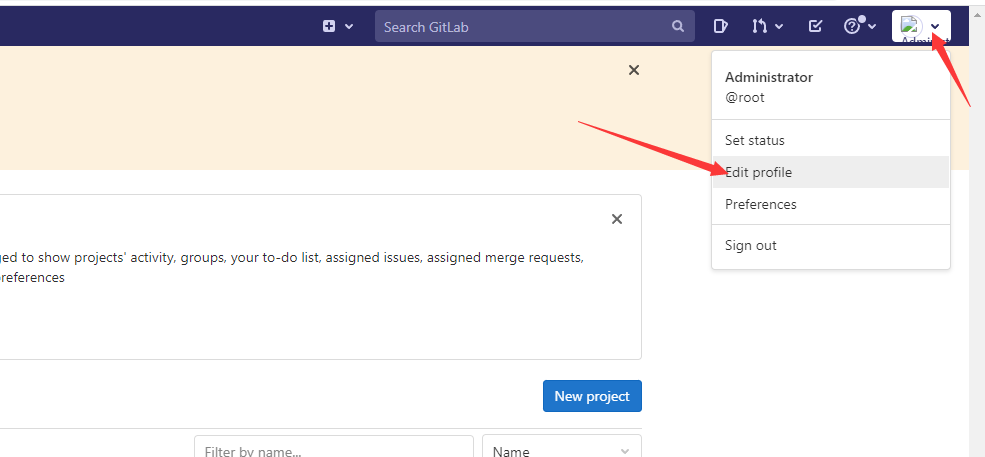
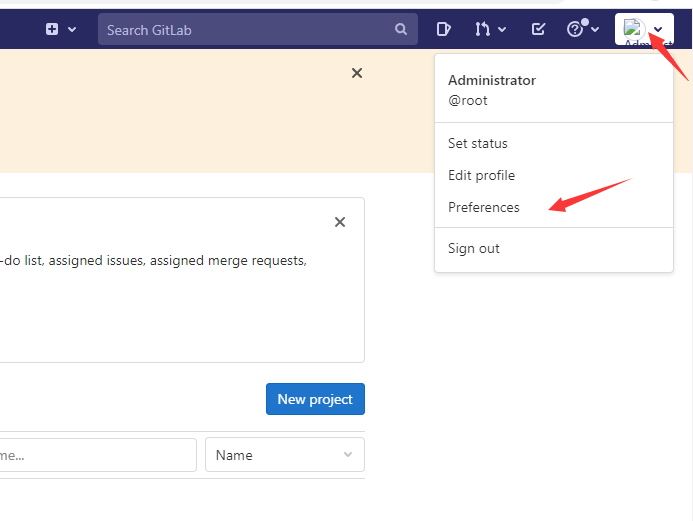
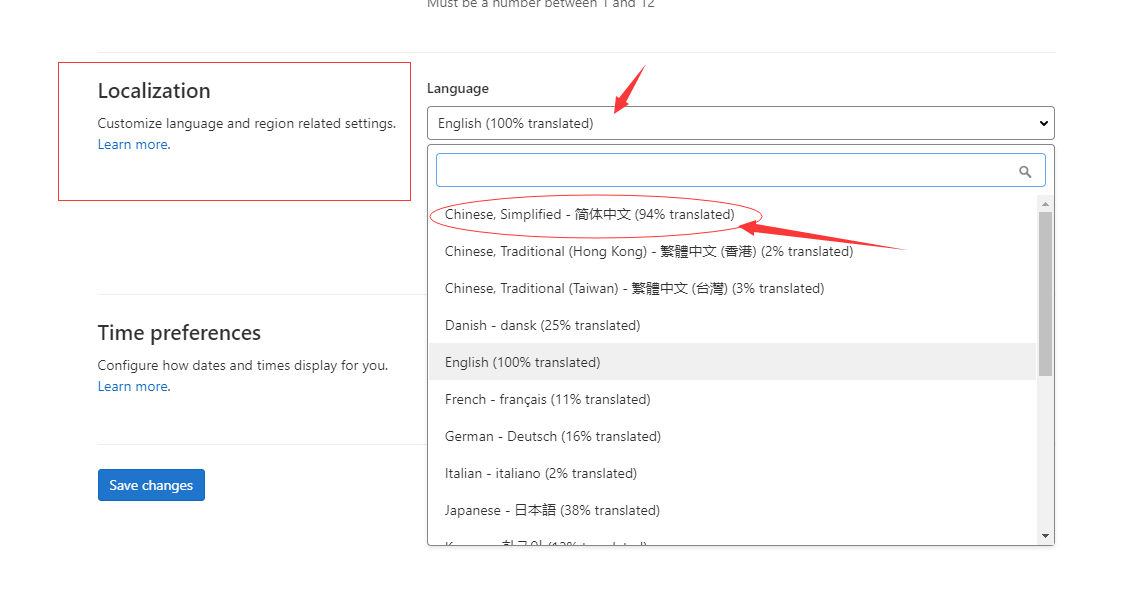
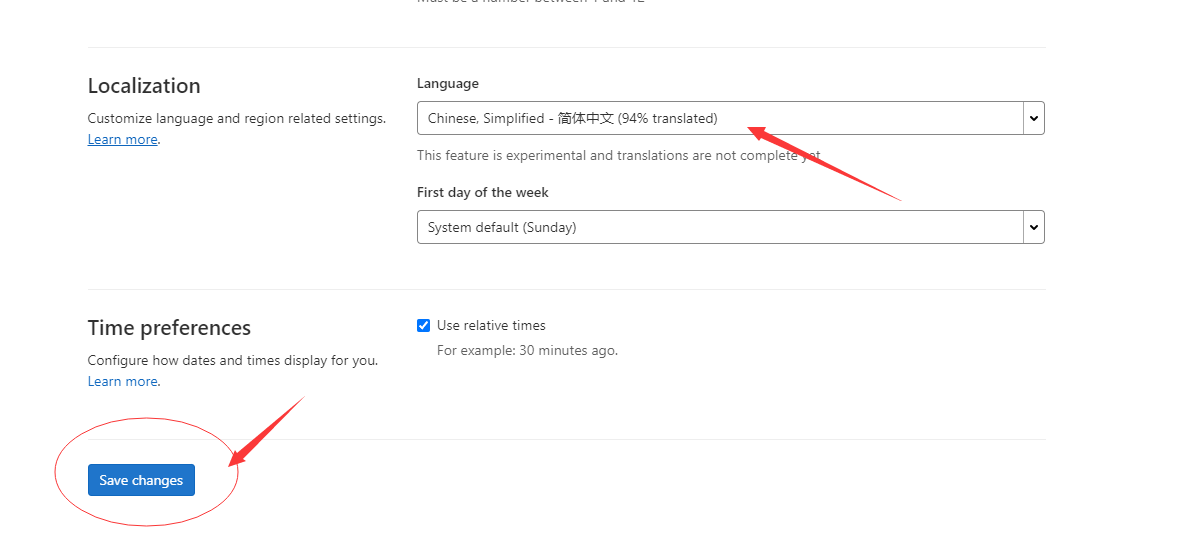
修改Gitlab界面为中文
,
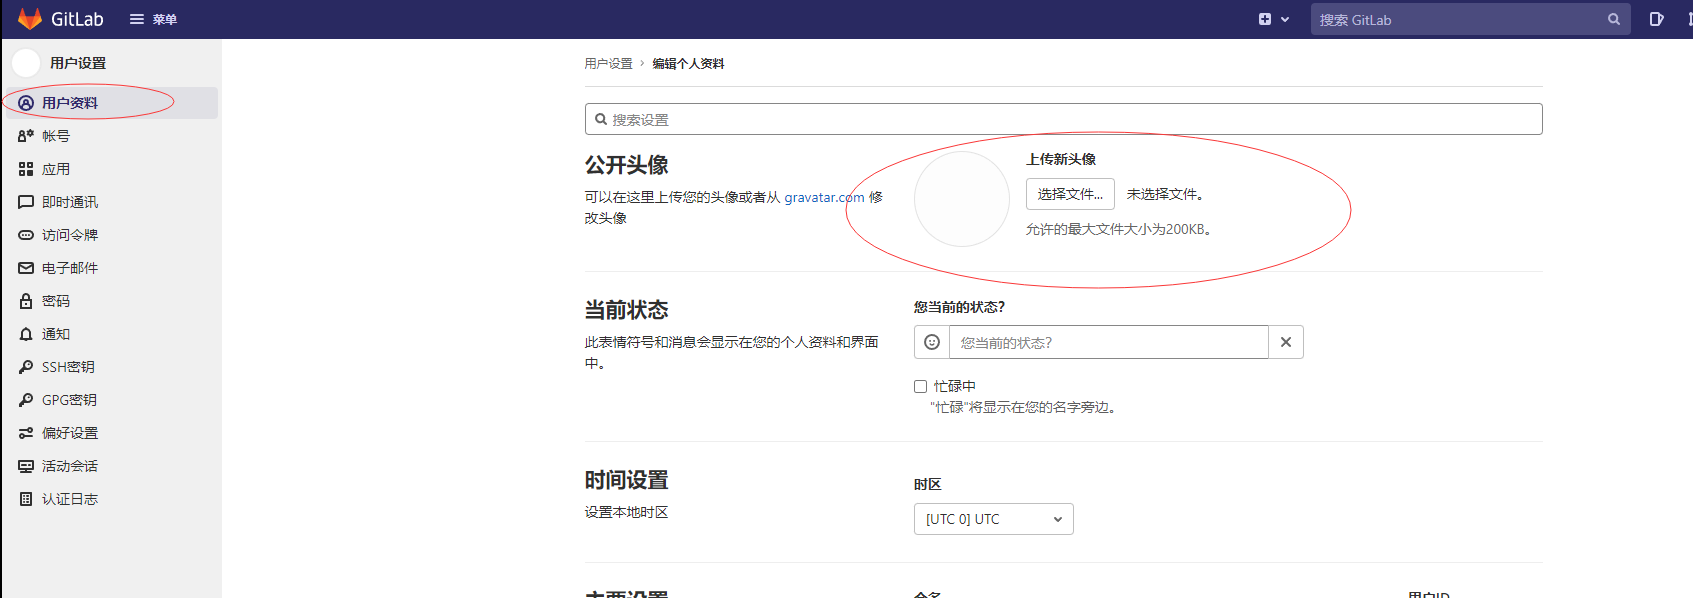
拉到最下面更新一下个人资料就可以了
